
הצפן מקל USB באמצעות אמצעי לוח Windows
תחת Windows אתה יכול גם להצפין מקלות USB באמצעי לוח. נראה לך איך.
האם גרסת Windows שלי יכולה להצפין מקלות USB?
לחלונות פונקציה משלה להצפנת מקלות USB. עם זאת, זה נכלל רק בגירסאות היקרות יותר של Windows 7 ו- 8:
- תחת Windows 7 אתה זקוק לגירסה "Ultimate" או "Enterprise", תחת Windows 8 "Pro" או "Enterprise".
- אם זה המקרה, למערכת שלך יש את הכלי "BitLocker ללכת". בפסקה הבאה נסביר כיצד תוכלו להשתמש בה להצפנת מקלות USB.
- אם אין לך גרסאות Windows שהוזכרו, תוכל לבצע את ההצפנה באמצעות תוכנה חיצונית. אנו מראים לכם איך זה עובד בטיפ המעשי הזה.
הצפן מקל USB באמצעות אמצעי לוח Windows
לפני שתתחיל בתהליך בפועל, עליך לעצב את מקל ה- USB באחד מהפורמטים NTFS, FAT, FAT32 או exFAT. FAT מומלץ למקלות USB שכן תקן זה תומך גם במערכות ישנות יותר כמו Windows Vista ו- XP. בטיפ המעשי תוכלו למצוא הוראות לעיצוב.
- לאחר עיצוב ה- USB, אתה יכול להתחיל. ראשית העתק את הנתונים הרצויים למקל ה- USB.
- ואז פתח את לוח הבקרה והזן את "BitLocker" בחיפוש שלמעלה.
- אם תבחר בקטגוריה "הצפנת כונן של BitLocker", תקבל סקירה של כל הכוננים וספקי הנתונים.
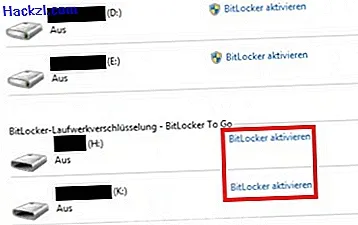
- בתחתית הרשימה עליכם למצוא את מקל ה- USB. לחץ על הקישור הכחול "הפעל את BitLocker" (ראה תמונה).
- ואז סמן את האפשרות "השתמש בסיסמה כדי לבטל את נעילת הכונן" וסיסמא.
- בשלב הבא תוצע לך להדפיס את מפתח השחזור. עליך לעשות זאת ולשמור על זה. אם שכחת את הסיסמה שלך, אתה עדיין יכול להשתמש במקש כדי לגשת לדיסק הנשלף.
- כשאתה לוחץ על כפתור "התחל הצפנה", התהליך מתחיל. תלוי בכמה נתונים במקלדת ה- USB זה יכול לקחת מספר שניות עד מספר דקות.
- אם תכניס בעתיד את מקל ה- USB למחשב, תמיד תתבקש לבצע סיסמה.
- הערה: כדי שתוכלו לפענח שוב את מקלות ה- USB המוצפנים תחת Windows XP ו- Vista, אתם זקוקים לכלי הקריאה של BitLocker-To-Go.
בטיפ מעשי אחר, נראה לך כיצד להצפין את כל הכונן הקשיח שלך באמצעות TrueCrypt.